Course Objective


Course Objective;
Students will process materials using hand tools while following these elements of knowledge, skills, strategies, attitudes and perceptions related to the competency

Students will learn, for the competency as a whole:

• Basic technical terminology
• Basic hand tools used in this competency: planes, saws, mallets, hammers, wood chisels, squares,
files, rasps, pliers, screwdrivers, measuring instruments, etc.
• Occupational health and safety: individual protective equipment, equipment safety, ergonomic work posture, etc.
• Method for using materials economically
• Importance of following the manufacturing process for the object

Specific
attitude required for this competency:

patience, in order to persevere in spite of difficulties encountered

Tuesday 20 March 2018

Hand Made Planes!

This is Si Xiang Chu.


 Xi Xiang already had experience using hand tools before taking this cabinetmaking course.

Xi Xiang told me a great story about how he was elated the first time he walked into Canadian tire and saw all the electric tools. I had the opposite experience once,trying to buy a hand plane and the cashier insisted I would be better off with an electric version!!  I did not want an electric tool.


Anyway, Look at Xi Xiang's mastery. He built these Wooden hand planes to use with his sharp Chisels.   Wonderful. 

This plane is groovy!
Bolts and Wing Nuts were added to this rebate plane to adjust depth


This plane is made of Spanish Cedar and Pine.

Wednesday 30 September 2015

Paddling our way to the finish

To Make our  paddles we decided to use a mix of red oak and Basswood.
Traditionally paddles are made of Basswood because it is light weight. But the dense, open grained red oak was something different than the pine and basswood previously worked.

Students were given 5 feet of 6/4  red oak about 2"wide, and 52" of 4" wide 4/4 basswood to start with.

We then flattened or "Jointed" the  edges of our 3 components to glue together
Once we were happy with out joints we glued them together. While the glue was drying it was time to work on templates.

I like the contrasting  tones of the oak/basswood.


Rosen and his laidout template


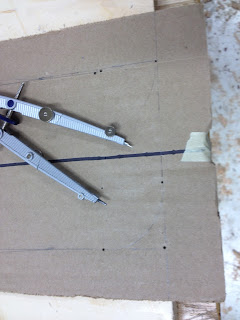
Templates were made from cardboard, first Melanie makes a centre line to be symmetrical,

Rosen uses a compass to layout his template
Using a compass for symmetrical radius's


We choose the shape that felt represented us individually


Finally Andy cuts his with scissors and uses his sanding block and 80 grit sandpaper to perfect his shape.
Now it is time to flatten the bottom of the paddle the by planing the oak flush with basswood. The 6/4 oak is reduced to 1 1/4" along the neck  too.
Orlando then traces his template onto the basswood and oak. The centre line is used for reference..

Relief cuts are ideal at this point

Then Andy rips off excess as best he can close to his layout lines.
Deann is not impressed with the time it takes to rip this one out with a Ryoba saw.

a work in progress
Our well tuned hand planes do quick work on the surface of our paddles


Then a Rasp is in  order to navigate curves


Clamping it 'old school'


 The cheeks were added (1"X  1 1/2" X 6") before the evening was over  so they could be worked the next day

Just like the bottom of the paddle, both edges to be glued together were flattened before lamination.


Tapering the paddle
Orlando has laid out his taper.   3/4 from   the stem to 1/4 on the end


Rosen finds the center of his paddle and then lays out 2 lines on either side to target his taper

 He  then planes  down to his lines

Calipers are used to determine the thickness away from layout lines
The Shaft 
Our paddle Shaft is 1 1/2"wide and 1 1/8" thick

First we found the center of the shaft by dividing the measurement found on our ruler in two when placing it diagonal.

For example, this six inch ruler is placed with the 1" line on one side and the 5" line on the other side. That's 4" long on the diagonal. So half of 4" is 2". Count 2" from either of the edges and  find the center of the blank at the 3 inch mark.

Now that we have the center point, we have marked out 3/4" from either side to mark out the 1 1/2" wide shaft on center. 


The same was done on the edge of the shaft to layout the 1 1/8" thickness. From our center we marked 9/16" either side to total 1 1/8" 


Time to plane down to our targets.


Andy asked about the layout for his handle. I gave him my 2 cents and came back later with a toonie.

The Handle should span about 3 1/2"

Andy uses a half round Bastard file to match the shape of his palm. 
 Inside curves can be worked so the basswood and oak transition together.
We do our best to stay within our layout lines.


The Spoke Shave is a fantastic plane to shape the shaft of the paddle.

We are lucky to have some brand new Lie Nielsen Spoke shaves at the shop


Deann checks the thickness across her paddle with Calipers


Wednesday 23 September 2015

Square up a board / Shooting Board pt.2

The Egg. (or Chicken?)
RTC students and I made Paul Sellers' Shooting board.
I modified it somewhat to suit upcoming modules by changing a few things.

Left is P. Sellers' and right is ours.
  In module 2 students often make small samples so I spaced out the miter stop.
I also reduces the thickness of the top component by 1/4"


Students started with 32" X 8" of already dressed 4/4 pine ( approx 7/8" thick ). Also given to them was another dressed board 3/4" X 4 1/2" X 20" for the top.

Components:
  1. Bottom - 8" X 19"
  2. Cleat - 3 1/4" X 12"
  3. 2 wedges (stops) - 3" tapering to 1 1/2" X 12"
  4. Top - 4 1/2" X 19"

First Vera crosscut her 32" from an 8' board using a sturdy Crosscut Backsaw


Then she laid out her components before separating (by crosscuting)  the 19" bottom from the 12" wedges and cleat.


Anthony then found the sharpest Rip Saw and ripped the cleat off of the two wedges.

Below Justin attempts to follow the diagonal layout line so he can separate the two wedges.

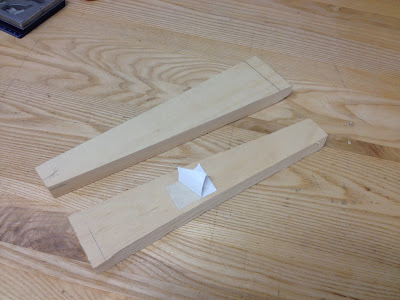
The wedges are then taped together with double sided tape and twinned using a block or smoothing plane.


Wilbert gets down to planing and checks to make sure the two edges of his wedges are identical and most importantly SQUARE

The ends of the wedges are not a concern at this point.

Once the wedges are done we set them aside and begin the layout on the top.

 Student reminded me of my long winded speeches about accuracy and craftsmanship when I began to demonstrate the layout with a combo square. So I put my money where my mouth is and grabbed a compass so I could bisect 180, then 90 to layout the first lines. 


_______________
____\_____|_____
    6"                   4 1/2" 
45 degrees 6" from the bottom
90 degrees 4 1/2" from the top
Andy scores those lines with a sharp knife to make a register for his chisel.


Now Andy can place his chisel inside the knife line and sever the fibers all the way across.
Be sure to have the bevel side of the chisel facing the section where the material will be removed ( Dado )
Now Andy can lean the chisel back onto the bevel and start about a 1/4" back to begin removing material

 Now Orlando finds his Identical wedges and places one side against the wall of the newly chiseled line
He can now accurately trace the opposite side of the tapered dado.


Orlando is very anal about his right angles, and so he should be.
Clamping a square block along the new line for the chisel to follow allows little room for imperfection

Material is then chiseled out carefully. With the chisel upside down, depth and aggressiveness is controlled by raising and lowering the handle while striking it with a mallet or by pairing
 Chisel from the middle of the dado toward the walls, then snap off the shaving by placing the back of the chisel against the wall at 90 degrees where you originally started.
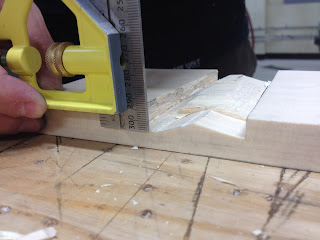
The combo square makes a nifty depth gauge. Set it to 1/4" and don't chisel too deep.
THEN....


Pair away with a chisel.......Or use a Router Plane


 Not too shabby Fat Wolf!


Pete will layout his chamfer with the combo square for the underside of the top component we just worked on. After he will use them to guide his block plane.
The Chamfer is 1/8" X 1/8" and Pete wants to be meticulous because for Pete's sake it's his shooting board !


 Those Layout lines sure did  the trick 


Screw together


Andy Shows of what a square he is.

Pete Labels his wedges (stops) because they are one of a kind.


The  Rebate 
A rebate about 1/16" deep is made by shooting with the side of the plane flat against the board and extending the iron out more and more each pass.
After assembly with screws, a rebate must be run just over the chamfer so the plane iron doesn't catch the side of the top component  when shooting.

Of course this would probably happen anyway from use but  it is best to do it before use.

 Watch Orlando demonstrate A) how sharp he is, B) how the shooting board simplifies things by holding the plane 90 degree on one side, and C) How annoying I am constantly pressuring him to do stuff with my iPhone in his face.

Pine doesn't scrape very well, and we haven't even talked much about the scraper. But Orlando has his awesome new sanding block. 
Of course STEEL BEFORE SANDPAPER rule always applies for any good woodworker. So Orlando first trued up the ends of his shooting board with a block plane before sanding.
 
A final sand with  a 120 grit aluminium oxide paper and sanding block produces a  surface produced with craftsmanship.